Welcome to the WATGPU research cluster
Introduction
Welcome to WATGPU, a University of Waterloo School of Computer Science GPU cluster aiming to facilitate access to computing resources for research purposes. This documentation serves as a comprehensive guide to understanding and utilizing WATGPU, a cluster managed through the Slurm workload manager.
Download pdf presentation here: 2024/07/25 version.
View the recording of the seminar from the 2024/07/25.
Shared GPU Resources
The concept is simple:
- Faculties buy GPUs
- The school buys super-computers
- We plug the GPU in the machines and give access to everyone.
- When a GPU is not used by its owner, it is available for everyone to use.
This pipeline is flexible as the main is to share computing resources accros the school. For example, we have machines owned by faculties. If you would like to contribute hardware, you can contact Lori(lori.paniak@uwaterloo.ca).
Getting access
WATGPU is owned by Cheriton School of Computer Science, only faculty member and cross-appointed faculty may get or sponsor access to the cluster.
Before making an account request, please load an SSH key at https://authman.uwaterloo.ca
Make sure you provide your WATIAM username in the email you send.
- Faculty (CS or cross-appointed): Please contact watgpu-admin@lists.uwaterloo.ca
- Master and PhD students1: With the agreement of the faculty you are working with, send an email to watgpu-admin@lists.uwaterloo.ca with them in CC.
- Undergrad students1, Research Fellows and Guests : Ask the faculty you are working with to send an email to watgpu-admin@lists.uwaterloo.ca on your behalf for you account creation, or forward us an email confirming their approval with them in CC.
Contact
If you require assistance while using WATGPU, you can contact the following:
- Admin support: watgpu-admin@lists.uwaterloo.ca
This address redirect your message to all WATGPU admins so we can answer faster.
Slurm: How it works
Slurm simplifies the user experience by allowing you to submit, monitor, and manage your computational jobs seamlessly. Through straightforward command-line interfaces, you can submit batch jobs, specify resource requirements, and monitor job progress.
Once your script is ready, launching a job is fairly simple:
- Login: Access watgpu.cs using your credentials.
- Submit a Job: Utilize the
sbatchcommand to submit your script that you wish to run. Think of it as asking the server to perform specific computations for you using specific resources (how many GPUs, how much memory ...). - Monitor Progress: You can use
squeueto view the job queue and monitor job details. - Enjoy: Your job will be run by the server as soon as the requested resources are available.
For more in-depth information, visit this page.
Thank you for choosing WATGPU. We're here to simplify your computational tasks and enhance your research.
Happy Computing!
-
WatGPU cluster is a research resource. Access will only be granted to students actively involved in a School of Computer Science or cross-appointed research group. ↩ ↩2
Cluster state information
The cluster under maintenance for the day (2026/09/12). We will keep users updated when the cluster is back online.
Current cluster loads
The cluster consists of six servers. GPU utilization of the servers are shown below, and the links will take you to other dashboards detailing other performance metrics of the servers. Current loads are:
watgpu-100.cs
watgpu-200.cs
watgpu-300.cs
watgpu-400.cs
watgpu-500.cs
watgpu-600.cs
watgpu-700.cs
watgpu-800.cs
watgpu-900.cs
watgpu-1000.cs
Cluster GPU Layout
watgpu-100
| Index | Model | Memory |
|---|---|---|
| 0 | NVIDIA RTX 6000 Ada Generation | 45.0 GB |
| 1 | NVIDIA RTX 6000 Ada Generation | 45.0 GB |
| 2 | NVIDIA RTX 6000 Ada Generation | 45.0 GB |
| 3 | NVIDIA RTX 6000 Ada Generation | 45.0 GB |
| 4 | NVIDIA RTX 6000 Ada Generation | 45.0 GB |
| 5 | NVIDIA RTX 6000 Ada Generation | 45.0 GB |
| 6 | NVIDIA RTX 6000 Ada Generation | 45.0 GB |
| 7 | NVIDIA RTX 6000 Ada Generation | 45.0 GB |
watgpu-200
| Index | Model | Memory |
|---|---|---|
| 0 | NVIDIA RTX 6000 Ada Generation | 48.0 GB |
| 1 | NVIDIA RTX 6000 Ada Generation | 48.0 GB |
| 2 | NVIDIA RTX 6000 Ada Generation | 48.0 GB |
| 3 | NVIDIA RTX 6000 Ada Generation | 48.0 GB |
| 4 | NVIDIA RTX 6000 Ada Generation | 48.0 GB |
| 5 | NVIDIA RTX 6000 Ada Generation | 48.0 GB |
| 6 | NVIDIA RTX 6000 Ada Generation | 48.0 GB |
watgpu-300
| Index | Model | Memory |
|---|---|---|
| 0 | NVIDIA L40S | 45.0 GB |
| 1 | NVIDIA L40S | 45.0 GB |
| 2 | NVIDIA L40S | 45.0 GB |
| 3 | NVIDIA RTX A6000 | 48.0 GB |
| 4 | NVIDIA RTX A6000 | 48.0 GB |
| 5 | NVIDIA RTX 6000 Ada Generation | 48.0 GB |
| 6 | NVIDIA RTX 6000 Ada Generation | 48.0 GB |
watgpu-400
| Index | Model | Memory |
|---|---|---|
| 0 | NVIDIA L40S | 45.0 GB |
| 1 | NVIDIA L40S | 45.0 GB |
| 2 | NVIDIA L40S | 45.0 GB |
| 3 | NVIDIA L40S | 45.0 GB |
| 4 | NVIDIA L40S | 45.0 GB |
| 5 | NVIDIA L40S | 45.0 GB |
| 6 | NVIDIA L40S | 45.0 GB |
watgpu-500
| Index | Model | Memory |
|---|---|---|
| 0 | NVIDIA H200 NVL | 140.4 GB |
| 1 | NVIDIA H200 NVL | 140.4 GB |
| 2 | NVIDIA H200 NVL | 140.4 GB |
| 3 | NVIDIA H200 NVL | 140.4 GB |
| 4 | NVIDIA H200 NVL | 140.4 GB |
| 5 | NVIDIA H200 NVL | 140.4 GB |
| 6 | NVIDIA H200 NVL | 140.4 GB |
watgpu-600
| Index | Model | Memory |
|---|---|---|
| 0 | NVIDIA L40S | 45.0 GB |
| 1 | NVIDIA L40S | 45.0 GB |
| 2 | NVIDIA RTX 6000 Ada Generation | 48.0 GB |
| 3 | NVIDIA RTX 6000 Ada Generation | 48.0 GB |
| 4 | NVIDIA RTX 6000 Ada Generation | 48.0 GB |
| 5 | NVIDIA RTX 6000 Ada Generation | 48.0 GB |
watgpu-700
| Index | Model | Memory |
|---|---|---|
| 0 | NVIDIA H200 NVL | 140.4 GB |
| 1 | NVIDIA H200 NVL | 140.4 GB |
| 2 | NVIDIA H200 NVL | 140.4 GB |
| 3 | NVIDIA H200 NVL | 140.4 GB |
watgpu-800
| Index | Model | Memory |
|---|---|---|
| 0 | NVIDIA H200 NVL | 140.4 GB |
| 1 | NVIDIA H200 NVL | 140.4 GB |
| 2 | NVIDIA H200 NVL | 140.4 GB |
| 3 | NVIDIA H200 NVL | 140.4 GB |
| 4 | NVIDIA H200 NVL | 140.4 GB |
watgpu-900
| Index | Model | Memory |
|---|---|---|
| 0 | No GPU | 0.0 GB |
watgpu-1000
| Index | Model | Memory |
|---|---|---|
| 0 | NVIDIA RTX PRO 6000 Blackwell Max-Q Workstation Edition | 95.6 GB |
| 1 | NVIDIA RTX PRO 6000 Blackwell Max-Q Workstation Edition | 95.6 GB |
| 2 | NVIDIA RTX PRO 6000 Blackwell Max-Q Workstation Edition | 95.6 GB |
| 3 | NVIDIA RTX PRO 6000 Blackwell Max-Q Workstation Edition | 95.6 GB |
| 4 | NVIDIA RTX PRO 6000 Blackwell Server Edition | 95.6 GB |
| 5 | NVIDIA RTX PRO 6000 Blackwell Server Edition | 95.6 GB |
watgpu-1100
| Index | Model | Memory |
|---|---|---|
| 0 | NVIDIA H200 NVL | 140.4 GB |
| 1 | NVIDIA H200 NVL | 140.4 GB |
| 2 | NVIDIA H200 NVL | 140.4 GB |
| 3 | NVIDIA H200 NVL | 140.4 GB |
| 4 | NVIDIA H200 NVL | 140.4 GB |
Managing virtual environments on the cluster
Virtual environments are self-contained directories that contain all libraries and dependencies for a specific project, allowing you to work on multiple projects without conflicts between their requirements. They help you isolate project dependencies, manage versions, and ensure that different software stacks don't interfere with each other. This can be especially useful when working on WATGPU, since there might be specific versions of libraries that may be required for your specific research projects.
The default environment manager for all users on the WATGPU cluster is conda, though pip virtual environments are also supported.
Creating and activating conda environments is simple on WATGPU:
(base) $ conda create -n <conda-venv-name>
(base) $ conda activate <conda-venv-name>
<conda-venv-name> $
You can create pip virtual environments while a conda environment is activated, and after creating the pip virtual environment, you can deactivate the conda environment and activate the pip virtual environment normally.
(base) $ python -m venv <venv-name>
(base) $ conda deactivate
$ source <venv-name>/bin/activate
Installing useful tools through conda
Tools like nvcc and nvtop can be installed using conda since conda is also a package manager.
To perform a basic install of all CUDA Toolkit components using conda, run:
conda install cuda -c nvidia
You can install previous CUDA releases by following the instructions detailed in the Conda Installation section of NVIDIA's online documentation.
To install nvtop, which can be used to better monitor GPU utilization and GPU memory usage, run:
conda install --channel conda-forge nvtop
Further information about nvtop can be found here.
If a tool suggests you to use apt or apt-get to install it, please check if you can install the same tool through conda. If this isn't possible, you can send an email to watgpu-admin@lists.uwaterloo.ca and we can look into installing the tool for you.
SLURM
Do not run process on <username>@watgpu
The login node is not a compute machine, any process not runing on a compute node (<username>@watgpu[1-8]08) that use heavy resources will be terminated without warning. Please read this page to know how to properly access a compute node.
SLURM (formerly, Simple Linux Utility for Resource Management) is an application for managing tasks on computer systems.
The official SLURM cheatsheet can be found HERE
SLURM has two main operating modes: batch and interactive. Batch is the preferred mode for watgpu.cs: you can start your task and get an email notification when it is completed. See the batch section for more details. If you require an interactive session (useful for debugging) with watgpu.cs hardware, see the salloc section.
Before you submit jobs, you should learn about how to monitor running jobs and view cluster resources.
Monitoring jobs and cluster resources
Current jobs
To look at the queue of jobs currently, you can use squeue to display it. The command scurrent will also give all the current jobs running on watgpu.
By default squeue will show all the jobs the scheduler is managing at the moment. It will run much faster if you ask only about your own jobs with
$ squeue -u $USER
You can show only running jobs, or only pending jobs:
$ squeue -u <username> -t RUNNING
$ squeue -u <username> -t PENDING
You can show detailed information for a specific job with scontrol:
$ scontrol show job -dd <jobid>
Do not run squeue from a script or program at high frequency, e.g., every few seconds. Responding to squeue adds load to Slurm, and may interfere with its performance or correct operation.
Cancelling jobs
Use scancel with the job ID to cancel a job:
$ scancel <jobid>
You can also use it to cancel all your jobs, or all your pending jobs:
$ scancel -u $USER
$ scancel -t PENDING -u $USER
Monitoring cluster resources
To view all cluster resources, you can use sresources to monitor the availability of cluster resources. It will give you basic information on the:
- total number of GPUs available on each compute node
- the number of GPUs currently allocated on each compute node
- amount of available and allocated RAM on each compute node
- number of CPU cores available and allocated on each compute node
Batch mode usage
The batch allows you to give an entire script for WATGPU to run using a certain amount of resources. Your script will be running in the background, so you can log out without losing your progress. The resources used by your job will automatically be reliquished once the job is done.
You can submit jobs using an SLURM job script. Below is an example of a simple script:
warning: #SBATCH is the trigger word for slurm to take into account your arguments. If you wish to disable a line consider using ##SBATCH, do not remove # at the beginning of the lines.
#!/bin/bash

# To be submitted to the SLURM queue with the command:
# sbatch batch-submit.sh

# Set resource requirements: Queues are limited to seven day allocations
# Time format: HH:MM:SS
#SBATCH --time=00:15:00
#SBATCH --mem=10GB
#SBATCH --cpus-per-task=2
#SBATCH --gres=gpu:1

# Set output file destinations (optional)
# By default, output will appear in a file in the submission directory:
# slurm-$job_number.out
# This can be changed:
#SBATCH -o JOB%j.out # File to which STDOUT will be written
#SBATCH -e JOB%j-err.out # File to which STDERR will be written

# email notifications: Get email when your job starts, stops, fails, completes...
# Set email address
#SBATCH --mail-user=(email address where notifications are delivered to)
# Set types of notifications (from the options: BEGIN, END, FAIL, REQUEUE, ALL):
#SBATCH --mail-type=ALL

# Load up your conda environment
# Set up environment on watgpu.cs or in interactive session (use `source` keyword instead of `conda`)
source activate <env>

# Task to run

~/cuda-samples/Samples/5_Domain_Specific/nbody/nbody -benchmark -device=0 -numbodies=16777216
You can use SBATCH variables like --mem, for example the one above will assign 10GB of RAM to the job.
For CPU cores allocation, you can use --cpus-per-task , for example the one above will assign 4 cores to the job.
The --gres=gpu:1 will assign 1x GPU to your job.
Running the script
To run the script, simply run sbatch your_script.sh on watgpu.cs
Interactive mode usage
The interactive mode log you into a terminal session where you have access to the asked resources. This is useful for debugging or testing code.
You can book/reserve resources on the cluster using the salloc command. Below is an example:
salloc --gres=gpu:2 --cpus-per-task=4 --mem=16G --time=2:00:00
The example above will reserve 2 GPUs, 4 CPU cores, and 16GB of RAM for 2 hours. Once you run the command, it will output the name of the host like so:
salloc: Nodes watgpu308 are ready for job
here watgpu308 is the assigned host that the user can SSH to.
Ideally you want to run this command in either a screen or tmux session on watgpu.cs
Note: There is a limit of 7 hours on job running in interactive mode. To access resources for longer, consider using the batch for up to 7 days
Queue and Priority
Jobs in WATGPU are ran depending on their priority. Higher priority jobs go faster in the queue and can sometimes requeue running jobs to free resources for themselves.
To work with this priority, WATGPU resources have been separated into several partitions. The partition on which a job is running defines its possible allocated resources and its priority. Selecting a partition to run a job is easy:
- For interactive sessions: simply add
--partition=<PARTITION>argument in thesalloccommand. - For batch jobs: add
#SBATCH --partition=<PARTITION>in your.shscript
Following is a presentation of the different partitions available in WATGPU:
ALL
This is the default partition. A job submitted to ALL will be able to run on any available resources on WATGPU.
Jobs will have standard priority for the queue and might be preempted and requeued if a higher priority job is in need of resources.
All users have access to this partition:
#SBATCH --partition=ALL
SCHOOL
A job submitted to SCHOOL will be allocated only to GPUs owned by the School. While fewer resources are available in SCHOOL than in ALL, the chances of getting preempted by higher priority jobs are reduced.
Jobs will have standard priority for the queue and might be preempted and requeued if a higher priority job is in need of resources.
All users within the School have access to this partition:
#SBATCH --partition=SCHOOL
<GROUP>
When a group <GROUP> has entrusted their GPU(s) to WATGPU, they have access to the partition named <GROUP> linked to their contributed GPU(s).
Jobs will have high priority for the queue and will preempt and requeue lower priority jobs (from ALL and SCHOOL) if there are not enough resources available with a limit of GPU(s) up to their contribution.
All users from a group have access to their group partition:
#SBATCH --partition=<GROUP>
JupyterHub on WATGPU
JupyterHub allows you to easily run Jupyter notebooks on the cluster, providing you with another way to run interactive jobs to debug and test your code on the cluster. There is also the added benefit of being able to monitor your code's GPU utilization through the jupyterlab-nvdashboard extension that is enabled for all users, allowing you to understand if your code is efficiently using its allocated GPU.
Users who are looking to use Jupyter notebooks on WATGPU can securely sign in to WATGPU's JupyterHub at watgpu.cs.uwaterloo.ca/jupyterhub/ using their UWaterloo credentials and authenticate using Duo two-factor authentication.
After signing in, users can request resources by filling out a form that specifies, the compute node, number of CPU cores, memory (in GB), number of GPUs, and time.

For now, Jupyter notebooks run through JupyterHub are submitted to the ALL partition, and have some limits on the session's resources:
- up to 16 CPU cores
- up to 128 GB of RAM
- up to 4 GPUs
- up to 4 hours of runtime
Users requesting Jupyter notebooks through JupyterHub with more than 8 CPU cores are recommended to submit these jobs to the watgpu408 compute node since that node has more CPU cores than other compute nodes.
Jupyter notebooks through JupyterHub are meant for debugging and testing your code, not for full production runs - we recommend submitting an sbatch job for full runs.
Virtual environments vs Jupyter kernels for Jupyter notebooks
Virtual environments, as explained in our section about virtual environments on the WATGPU cluster, are used as isolated directories that hold any associated libraries and packages required for a project. Jupyter kernels are used by Jupyter to run Jupyter notebooks in different virtual environments. You can use different virtual environments as different Jupyter kernels, so each Jupyter notebook can run with the libraries and packages specific to that environment.
When you create a Python virtual environment, it typically comes with its own Python interpreter that can be used to install different Python packages within the environment. To use that environment as a Jupyter kernel, you need to make it available to Jupyter by installing the ipykernel package and linking the environment to Jupyter, allowing you to select that environment as the kernel when you launch a Jupyter notebook.
Installing ipykernel and linking conda venvs to Jupyter
Activate the conda virtual environment you want to add as a kernel, then install ipykernel using conda:
(base) $ conda activate <conda-venv>
<conda-venv> $ conda install -c anaconda ipykernel
then add the conda virtual environment as a kernel:
<conda-venv> $ python -m ipykernel install --user --name=<conda-venv>
Installing ipykernel and linking pip venvs to Jupyter
Activate the pip virtual environment you want to add as a kernel, the install ipykernel using pip:
$ source <venv-name>/bin/activate
<venv-name> $ pip install ipykernel
then add the pip virtual environment as a kernel:
<venv-name> $ python -m ipykernel install --user --name=<venv-name>
You can then launch a Jupyter notebook from the directory that contains the pip virtual environment directory.
Accessing Jupyter notebooks in the cluster
This page has directions for how to manually launch a Jupyter notebook on the WATGPU cluster; since we've launched JupyterHub for WATGPU, we recommend users to launch Jupyter notebooks using JupyterHub, following instructions on the JupyterHub on WATGPU page.
Manually launching Jupyter notebooks in the cluster
One can access jupyter notebooks on compute systems using SOCKS proxy and ssh through watgpu.cs. From a (Linux/OSX) terminal ssh to watgpu.cs:
ssh -D 7070 user@watgpu.cs.uwaterloo.ca
On a browser on your local (client) system, configure traffic to use a SOCKS proxy at localhost port 7070. FoxyProxy for Firefox can make this configuration easy to set up and modify.
Preliminaries: Create a conda environment that includes the jupyter server
Also add required conda packages for your working environment e.g. pytorch:
conda create -y -n jupyter-server
conda activate jupyter-server
conda install -c conda-forge pytorch-gpu
pip install jupyter
conda deactivate
Using jupyter notebooks with your environment
Make an interactive reservation with the SLURM scheduler:
salloc --gres=gpu:1 --cpus-per-task=4 --mem=32G --time=1:00:00
Once the reservation starts, ssh to the allocated compute system e.g. watgpu208:
ssh watgpu208
Activate your jupyter-server environment and start a jupyter notebook:
conda activate jupyter-server

jupyter notebook --ip $(hostname -I | awk '{print $1}') --no-browser
...
[I 2023-10-13 02:18:02.902 ServerApp] notebook | extension was successfully loaded.
[I 2023-10-13 02:18:02.902 ServerApp] Serving notebooks from local directory: /u3/ldpaniak
[I 2023-10-13 02:18:02.903 ServerApp] Jupyter Server 2.7.3 is running at:
[I 2023-10-13 02:18:02.903 ServerApp] http://192.168.152.121:8888/tree?token=141a606c1ec9d9f76f65395bd1a4042fb3a5e04307283592
[I 2023-10-13 02:18:02.903 ServerApp]     http://127.0.0.1:8888/tree?token=141a606c1ec9d9f76f65395bd1a4042fb3a5e04307283592
[I 2023-10-13 02:18:02.903 ServerApp] Use Control-C to stop this server and shut down all kernels (twice to skip confirmation).
[C 2023-10-13 02:18:02.915 ServerApp]

To access the server, open this file in a browser:
    file:///u3/ldpaniak/.local/share/jupyter/runtime/jpserver-232011-open.html
Or copy and paste one of these URLs:
    http://192.168.152.121:8888/tree?token=141a606c1ec9d9f76f65395bd1a4042fb3a5e04307283592
    http://127.0.0.1:8888/tree?token=141a606c1ec9d9f76f65395bd1a4042fb3a5e04307283592
Copy the link with the 8888 port to your broswer which has been configured to use SOCKSv4 proxy on localhost port 7070. Your juptyer notebook will be available.
Be sure to shut down the server when done with Control-c.
Custom kernels
There is a single default kernel at the moment: "Python 3". You can also create your own kernels by opening a Terminal inside the notebook:
Once you've opened the terminal you can create your own kernel. Below is an example:
conda create --name myenv # create a custom conda environment which will install packages to, and add to the notebook as a kernel
conda install --yes numpy # install a package you want
conda install -c anaconda ipykernel #install ipykernel which we will use to add kernel to notebook
python -m ipykernel install --user --name=myenv # add the conda environment as a kernel
VSCode Tutorial: Working with WATGPU
In this tutorial, we'll walk you through the process of setting up and using Visual Studio Code (VSCode) to work with WATGPU. This guide will cover connecting to the login gateway and accessing specific clusters (e.g., watgpu108, watgpu208, ...) after allocating resources.
Note that this method of connecting to WATGPU should be used for debugging and understanding your code via testing and notebooks. If you wish to run long experiments, please use the SBATCH command.
Prerequisites
Before you begin, make sure you have the following prerequisites installed:
Quick steps to install the Remote - SSH extension:
- Open Visual Studio Code
- Click on the Extensions icon in the Activity Bar on the side of the window.
- Search for "Remote - SSH" in the Extensions view search box.
- Install the "Remote - SSH" extension.
Step 1: Configuring VSCode
Once the extension is installed, follow these steps to connect to the login gateway (replace your_username with your actual username):
-
Press
Ctrl + Shift + P(Windows/Linux) orCmd + Shift + P(Mac) to open the command palette. -
Type "Remote-SSH: Open SSH Configuration File ...", select it and select the desired file (recommended file:
~/.ssh/config). -
Insert the following part and replace
<username>and<path/to/private/key>with your username and the path to your private key registered in WatGPU:#WATGPU Host DoNotConnect_watGPU User <username> IdentityFile <path/to/private/key> HostName watgpu.cs.uwaterloo.ca Host watGPU108 User <username> IdentityFile <path/to/private/key> HostName watgpu108 ProxyJump DoNotConnect_watGPU Host watGPU208 User <username> IdentityFile <path/to/private/key> HostName watgpu208 ProxyJump DoNotConnect_watGPU Host watGPU308 User <username> IdentityFile <path/to/private/key> HostName watgpu308 ProxyJump DoNotConnect_watGPU -
Save and refresh the Remote - SSH extension menu.
Step 2: Allocate Resources and Connect to Cluster
After successfully connecting via ssh to watgpu.cs.uwaterloo.ca, you'll need to allocate resources using salloc and then connect to a specific cluster:
-
Follow the Interactive mode part of the documentation to obtain resource allocation.
-
Once resources are allocated, connect to the appropriate cluster in VSCode:
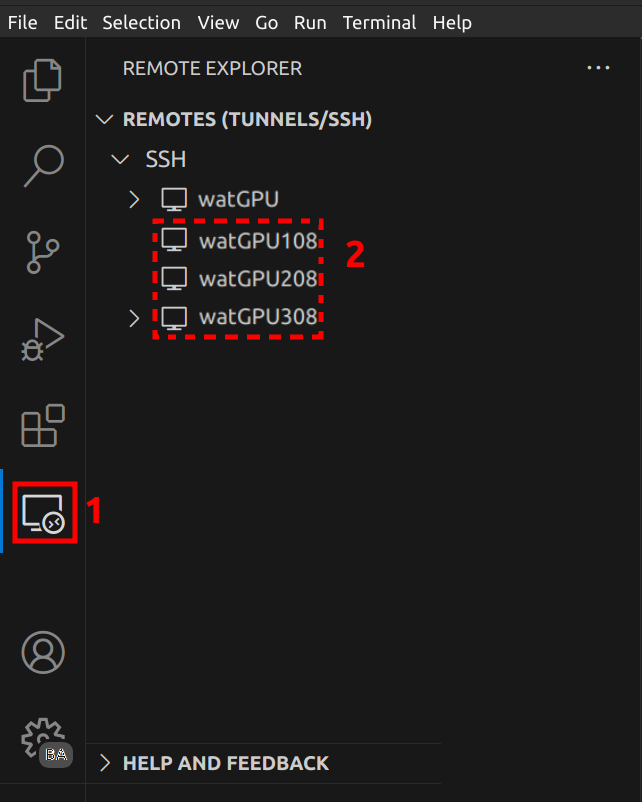
That's it! You are now set up to work with WatGPU using Visual Studio Code.